Data infrastructure includes the entire setup that supports data collection and aggregation towards analysis. As data types can be diverse (neural recording raw files, subject behavior logs, eye-tracking recordings, biomarker recordings, demographic and medical background, etc.), planning the structure and hierarchy of the stored data is important. When working collaboratively, it is crucial. Without creating conventions about what data is stored, the file hierarchy and naming, the data becomes a sore point instead of the goldmine that it is.
As correct planning of data infrastructure is challenging, the following roadmap was designed to help you navigate the data architecture of your study, whether working alone or in a group.
Important note about shared data: Collaborative work on data entails collecting data at different sites and then putting it in a shared location that is accessible by all collaborators to be able to analyze the data. However, sharing participants’ data between universities and institutions entails many legal considerations. The definition of sensitive data varies greatly between countries and local institutions’ regulations. Therefore, the first step to take when preparing for collaborative work on a dataset is to ensure that it will be possible to share the data collected between collaborators. There is no one-size-fits-all here; it is recommended to consult with laws and regulation departments of the different involved institutions to get guidance on how to do so.
Roadmap
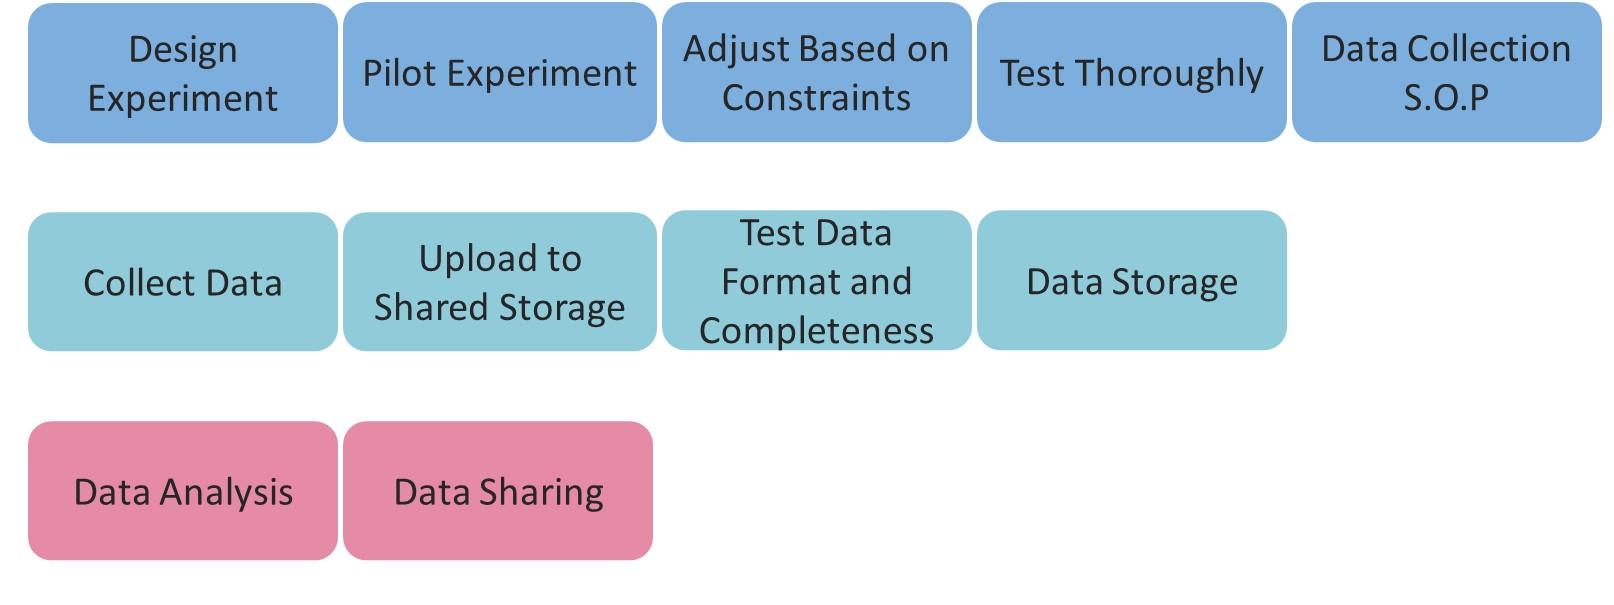
Data Collection Standardization

Design Experiment
Start by designing your experiment, including all the parameters, conditions and features of interest to your hypothesis. This step may sound trivial, but it’s not:
- Trying to make everything succeed at once is not possible, and often gets the opposite results. To avoid double work, mistakes, and patches on patches - slow is fast. So at this stage, invest in designing your experiment such that it has everything it needs to work properly in your environment.
- This step is all about investing in the experiment infrastructure: try not just to make things work, but make them work properly and efficiently. The more stable the experiment, the easier it is to make changes following the next steps.
At the end of this step, you should have the ideal experiment at hand; the one that has all the conditions and features you planned to have, implemented in the cleanest way possible. The one that doesn’t lack anything, and doesn’t require any additions that you know you need to insert at some point.
Pilot Experiment
Once it’s ready, thoroughly test your experiment. Make sure the order of all trials, blocks and conditions works; that the entire experiment works, from start to finish without crashing or freezing or raising warnings; that responses work as they should; that the output logs include all the relevant parameters and so on. A good rule of thumb is methodically trying to break your experiment, while listing all the things that need fixing.
Then, go back to the design phase to find and correct the errors raised in the piloting phase. But, again, don’t rush. Make sure you implement actual fixes and not “patches” that “aren’t pretty but working”. At this stage, you still don’t know what accommodations you’ll further need to make before running the finalized version of your experiment, and you don’t want the final version to be a scary, patchy, ugly monster that you (and any other researcher) are afraid to interact with as it might behave unexpectedly and fall apart.
Once you make it through a pilot run with no errors, bugs, or unexpected behaviors - your experiment is now stable enough to move on to the next step!
So far, the steps are consistent with what is done in a local workflow. But you can already leverage the fact that you are not working alone. To design the experimental paradigm, you can have one person dedicated to it, have it be a discussion between the different members of your collaboration, or have a couple of dedicated people come up with the experimental paradigm that will enable answering the question. Similarly, for piloting, if a member of your collaboration is exceptionally knowledgeable about technical issues, data collection, and the like, this person can take the lead on this aspect. You should think about the best way to use the knowledge in your team to ensure the best outcome. To ensure success, it is crucial that you map the different roles for this stage, following the RACI, for example.
Adjust Based on Constraints
At this stage, you know for sure your experiment works on a single setup - the one you piloted in. The next step is to extend the experiment such that it can work on other setups as well: it may be a different room in your campus, a hospital room, or other sites you collaborate with, all of which need the same experiment to work on different experimental environments.
To extend the experiment such that it works on other setups, you must know what those setups are.
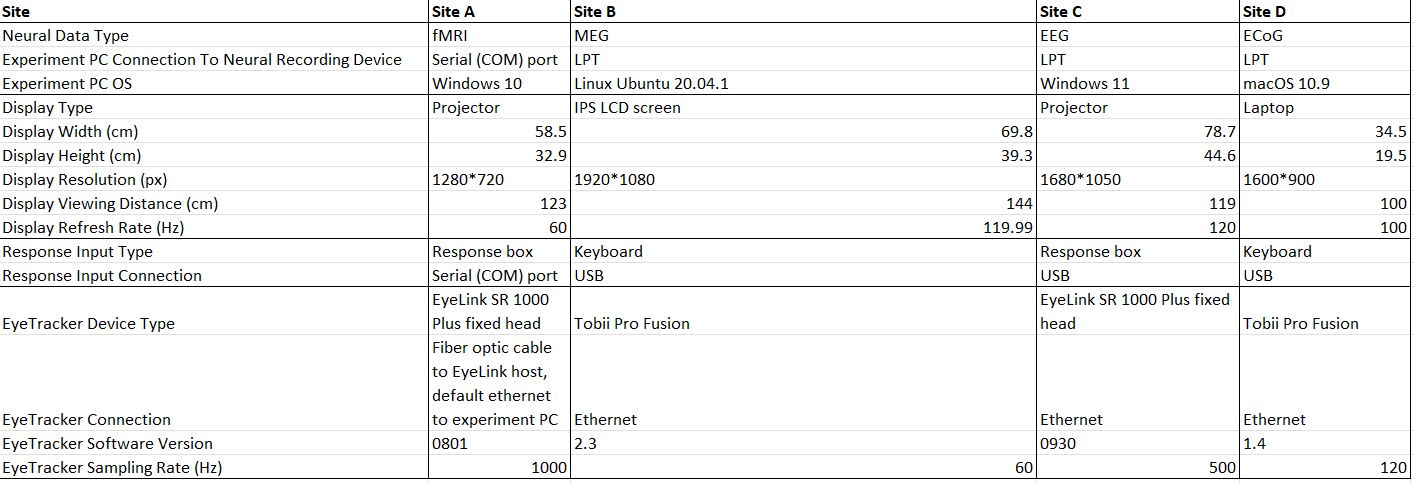
For that, it is critical to map crucial parameters of each setup’s environment, including all the devices that the experiment needs to communicate with to run (download the table below for a detailed example). These includes (but not limited to) contraints like the referesh rate of the display screen in the experiment room, the type of response device (and connection) connected to the computer the experiment should be run on, and many more features and limitations that stem from running in one place as opposed to another. Nothing is trivial, and the more details are documented the easier it is to compare between different setups, tailor the experiment to the setup’s needs, and fix issues that arise in the piloting stage (see next step).
Then, you need to adjust the working version of your experiment to accommodate all the technical constraints across experimental setups. Once again, make sure to document the changes you make, and be sure to embed them in the experiment in a way that makes sense with the experiment’s structure (not just something that “works for now”. Think about what would happen if you had to change setups, or a collaborator will have a new setup to run your experiment on. The goal is to prevent it from being a nightmare every time you need to accommodate your experiment).
Once you have collected all the constraints from the sites, you should know all the different outputs the experiment can produce (different devices might have different output formats and limitations). As we will see later on, it is crucial that the generated data’s naming and structure is standardized throughout. Everything that is generated by the experimental computer must be standardized. At this stage, you should make sure that the naming of all the different files that are generated are consistent and logical. This will save you a lot of time down the line.
Test Thoroughly
As you are collecting data at different sites, ensuring that the experiment runs in the same way everywhere is crucial. Therefore, you need to test your experiment across all these sites thoroughly. The tests must be executed on all the setups on which the experiment will be run. It may sound tedious, but the fact that something works for site A doesn’t mean it would work for site B. Yes, even if their technical setups seem the same.
Through our own experience, we have learned that sending out an experiment and asking the different labs to test it is not enough. This is because there are so far no clear standards on how to do so. Different researchers and laboratories have different understandings of what it means to test or what needs to be tested. You should, therefore, clearly define testing protocols. This should consist of a to-do list and a short-hand report guiding the researcher through all the tests that must be performed. This protocol must be defined to capture variation in all crucial parameters of your experiment to ensure that everything is fine. The different labs can then accurately perform the tests and provide a clear report that will be easy to interpret and adjust the experiment if needed.
After every round of testing across all sites, implement changes and fixes to the experiment software. This stage is done only once the experiment was run successfully on all sites.
Data Collection S.O.P
Once the experiment is up and running, it is important to ensure a uniform way of executing it, regardless of the experimenter, site, or neural imaging technique. That’s what standard operating procedures (SOPs) are for.
Importantly, the SOP refers not only to the way the experiment should be run in terms of participant instructions. It should contain explicit and specific information about the data to be collected as part of the experimental run, including instructions on interacting with the relevant devices in the experimental setup, and verification of recording files. This includes, but not limited to:
- The settings each device should have prior to the experiment (e.g., screen refresh rate, eye tracking device sampling rate)
- How to make sure each part of the setup is ready for the experiment execution (e.g., response box, programs running on the computer)
- What to do in case the experiment runs into an error mid-run (e.g., which files should be backed up, how to exit the experiment software safely)
- How to ensure existence and organize all the experiment outputs and recordings (e.g., a designated script to run after the participant is done; see more below)
- Clear instructions on how to interact with the participants: giving the instructions, answering questions…
Here are a few sample SOPs: Cogitate’s ECoG data collection SOP, HCP’s collection SOP
Collaborative Data Architecture

Collect Data
Once the data is collected, it needs to be transferred into storage, where it is available for further processing and analyses. It is important to gather all the data collected from each subject once the experiment is done, and upload it to a shared storage space as soon as possible. As mentioned earlier, the output of the experimental computer should be standardized already. Now is the time to standardize everything else. You should explicitly map out and document all the outputs that are collected: the neural data, biomarker recordings, but also experimental notes from the experimenter, additional questionnaires, etc. At this stage, you need to know the entire structure of all the files and folders that are outputted as part of your experiment. Look at all the data that exists. Understand what’s the source of each output file, and make sure that their hierarchy and naming make sense.
Without data naming and structure standardization, accessing data would become immensely cumbersome. While single researchers are (mostly) consistent within themselves, different researchers will come up with very different structures and names. Imagine having to analyze a data set where every second subject has a completely different and arbitrary naming convention. This would be a nightmare. By defining (and enforcing, as we will see below) clear naming conventions, this issue will be avoided.
You might want to consider formatting the data in a way that is already compatible with standard structures such as BIDS. This is useful both for sharing data within a project (see below), and also with the research community. Of course, BIDS conversion of some files can be done automatically at a later stage (e.g. EEG data), but we recommend to try to think of the standards you would like to use already in the output mapping stage - and see how those outputs can fit into the standard you plan on using. One big advantage of relying on standards such as bids is that they also come with many associated tools to facilitate different aspects of data management and analysis. There are many existing tools to convert existing data sets to BIDS (mne-bids, bids-coin…), validate data to make sure that they are compliant with the standard and many more. In any case, once you are done mapping all the outputs of the experiment, you should be able to know exactly what recordings and logs you have, what they contain, what are their names and file types, and their hierarchy.
Once all the outputs are mapped, it is clear which files and folders are shared across sites, and which differ (for example, based on the neural recording method used). Even if there is only one possible data structure - listing it in its entirety, including all the file names, name extentions, and folder hierarchy is very important. Without it, there is no way to verify whether the collected datasets are complete or corrupt.
To download an example for an experiment datastructure output click here. This folder contains an example for file and folder hierarchy, naming conventions and file types of a typical experiment. In the “permanent_storage” directory, you can find several subjects following strictly defined file naming and structure conventions. In the directory “quarantine”, you will find several examples of data not following the said conventions. Of course, your experiment’s output might differ, and so you will need to create a different folder structure. The key part is to maintain a clear convention, that is then testable at the data collection stage.
After mapping the dataset structure, create a designated program (based on the experiment’s outputs and the recorded data) that automatically organizes all the data into a standardized structure, shared across sites. Based on the mapping, it will be useful to alert the researcher if files are missing, or their name/format for some reason deviate from the convention they should be in.
Once experiment’s output data is in order at the site level, it is time to take steps towards uploading it into the storage where it will be further processed and analyzed. The following overview depicts the steps needed to safely (and easily) bring data from the experiment’s devices onto a server.
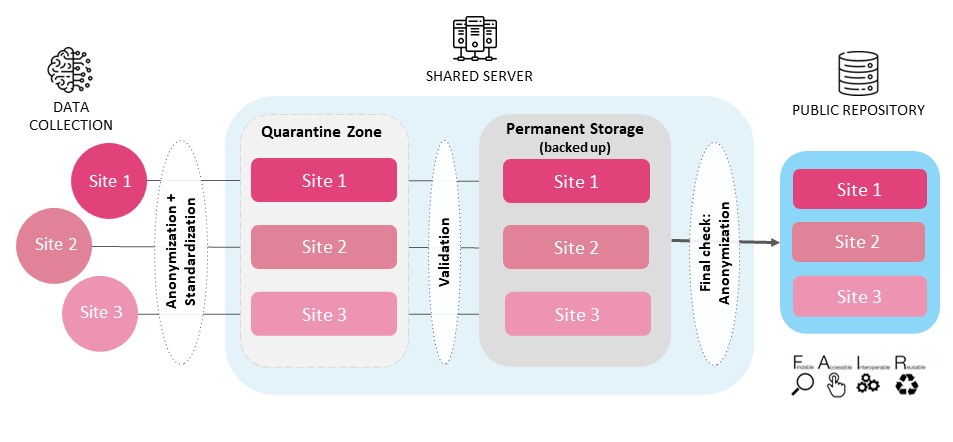
Upload Data to Shared Storage
- As previously mentioned, once data is collected, it must go through a program that verifies all the recordings and outputs are in order, with the right name, extension, and hierarchy.
- Then, it is important to make sure that the data contains no personal information about the subject; knowing the data sharing restrictions in advance, run programs to remove sensitive information from files once the data is in order (still locally).
The next step is to upload the data (converted, anonymized) into a “quarantine zone”: a designated folder where the data is temporarily stored to be checked and validated.
Test Data Format and Completeness
The quarantine folder centralizes all the collected data, and at this stage it should be tested for validity. This is why it is so important that the uploaded data will already adhere to a common format - otherwise, it is impossible to check each and every dataset. In the quarantine zone, each dataset should be checked for: • Adherence to the structure and naming conventions (otherwise, the check cannot continue as the dataset is not in order) • Completeness (no missing data files or types) • And anonymity of the file content
If a dataset fails to uphold any of these standards, it should be deleted from the quarantine zone (to be reuploaded). If the dataset is valid, it then needs to be moved to a permanent storage space, that is also backed up, for further processing and analyses.As the data format and completeness is a set of fixed conventions (defined in the previous steps), it is strongly advised that these tests are performed through scripts.
The data format and naming convention should be clearly stated in a machine readable format (json files for example) providing a mapping of everything that is expected from a given unit (in most cases a participant or patient) from a study. Automated scripts can then be launched listing all files in a given directory, returning error in case of violation of conventions. In case BIDS format was adopted in a collaboration, BIDS validators (see resources) can be leveraged to avoid reinventing the wheel. For any additional files not mapped by standard BIDS validators or in the case BIDS format was not adopted, custom made scripts can easily be implemented.
While such automated checks can take a significant amount of time to develop initially, the return on investment is high for two reasons:
- it minimizes the potential for human error
- the time invested for every new data is minimal
In addition to scripting data validators, automatization can be pushed one step further by automatically launching the checks at regular intervals, to avoid the need for manually launching the check every time a new data set gets uploaded. This can be achieved through the help of existing tools such as chronjob, enabling scheduling the launch of test scripts at regular interval. The work associated with such automation is also non-negligeable, but if the data collection process extends for a considerable amount of time and the sheer amount of data is large, this is also very well invested efforts.
Data Storage
The data that made it here is good to go! This is also the data that the researchers will want to share with collaborators, colleagues, and eventually with the public for open data practices.
As such, it is important to make sure that this data cannot get edited or manipulated, and that every processing step from this stage onward does not transform the data in any way. Meaning, that this storage space:
- Should be backed up periodically
- Should have only reading access, to prevent data from transforming
The presented data architecture is not the only option to make the data accessible to several collaborators. Other solutions (such as the one used by the International Brain Laboratory) exists, and we highly recommend exploring those. Our infrastructure has the advantage of being relatively simple to implement, as, in its simplest form, it can consist of two folders on a server. You can find a toy example of what such a structure could be here. It is also well scalable, as the cogitate project uses a very similar infrastructure, with 3 different recording modalities (fMRI, iEEG and M/EEG) with hundreds of participants.
Data Sharing
It is crucial for collaborative analysis efforts to be able to share data among involved collaborators to a shared repository to ensure the smoothest possible process to access and process data. For this to be possible it is crucial that data sharing agreements are investigated and finalized as early as possible. You want to avoid at all cost the scenario where data start coming in but you suddenly realize that some of the data cannot be shared with the members supposed to perform the analysis. Data sharing rules are however completely dependent on local regulations and some data might not be sharable by some collaborators. This must be addressed at the very outset of a collaboration to avoid any bad surprises. Below we layout the ideal infrastructure assuming that all site can share all their data to a common repository, but be aware that this might not always be possible.
Phew! Done with the infrastructure. Onward and upward!