Data analysis is the main challenge in collaborative research projects, as it is not only the study’s goal, but it also expresses many types of obstacles: managerial (collaborating on data analysis requires a delicate balance between different habits, opinions and responsibilities), structural (collavorative data analysis requires data to be shared, which is not as trivial as it may sound) and technical (for a truely collaborative formation of data analysis, collaborators need to be able to provide good-quality code to their peers, while understanding and executing their respective codes). The latter is the topic of this page.
The key aspects of collaborative data analysis are:
- Analysis plan: the questions we set out to answer and the exact statistical tests that are fit to answer them.
- Implementation of the analysis plan: the entire process of data pre-processing and the implementation of the actual analyses
Statistics and Theoretical Decisions
Even when working alone, the importance of planning the entire data pre-processing and analysis pipeline in advance has been highlighted in recent years. Following the replication crisis, the value of preregistering analyses in advance is immense and contributes to improving the quality of the research in the field.
Planning and registration are crucial when working in collaboration, as they are the crux of the study; these are the steps that test the research hypotheses. Therefore, the analysis plan is one of the things that should be specified in the research management plan. In addition to internal documentation of the statistical analyses, it is good practice to preregister the study.
In this tutorial, we focus on the implementation of the statistical analysis plans. The need to write good software for data analysis has been long acknowledged, with projects such as software carpentry teaching researchers about writing good scientific software. Yet, writing good-quality codes is not sufficient when collaborating with fellow scientists. Collaborative work on research software requires additional skills, assumptions, and adjustments, as we detail below.
I’m a scientist, not a professional programmer
Data processing and analysis rely on software. You can (and should) use as many ready-made packages as possible, as there are many useful tools out there (check out the resources page). Yet, you still need to understand how to incorporate these tools into your data processing pipeline.
Coding is a fundamental part of data processing and analysis. As such, researchers need to be able to create software to process their experimental data. When we work alone, it seems to us as if we can make things work without spending too much time on how our code looks, how it functions, which version of it we are currently working on, and how it operates under the hood - as long as it seems that it works w/o breaking.
But this is a mistake because such codes can (and will) contain errors. Programming is a tool; when we don’t use the tool of coding the way it’s meant to work - with a whole system of checks and balances - errors will arise. Errors are not only bugs that make a software crash; they can also be logical errors that generate false results and lead to fatally wrong conclusions. So even without collaborations, when we don’t use the tool of coding the way it’s meant to work, we are bound to not only make mistakes (everybody makes mistakes) but also miss them and let them critically affect our analysis.
If collaborators would work locally (meaning, on their own computers by themselves) and make scripts work without maintaining conventions, without testing them and without decent documentation, it would be tough to make progress.
The basic idea when programming the pre-processing and analysis code is that the code should do what the researcher had set out to do. And although it sounds simple, it’s not. It requires being able to make sure that the program actually works; this requires testing. The ability to test scripts is heavily based on programming language style and conventions being kept; otherwise, it is unclear how one can even devise a test a part of a script to see if it works. In addition, for other people (and future selves) to be able to use the program, even if it is well written and tested, documentation is necessary; otherwise, it’s very hard to understand what the program is supposed to do, what are its expected inputs and outputs or additional requirements.
Collaborative Coding Principles
Collaborative coding efforts rely on adhering to programming style and formatting conventions, software testing, and documentation and version control. The principles below were devised to help researchers ensure these fundamental pillars are in place, while minimizing effort. Awareness of the following principles will generate better-quality codes and make collaborators’ lives easier, preventing redundant work, misunderstandings, and hardships.
Don’t reinvent the wheel
We cannot stress this enough: in a collaborative research project, it is crucial to establish coding standards at the beginning of working on a project and make sure to maintain them throughout (for example, in the project plan). Importantly, there is no need to invent any standards; they all already exist.
Programming style and formatting: Every programming language has style and formatting conventions. Adhering to the programming language’s conventions makes coding easier. There are programming IDEs (integrated development environments) that are specific to a certain language, providing tools to make sure you stick to the conventions with a click of a button. Maintaining those conventions is not just for readability or aesthetics; useful tools (for example, basic testing packages) that save a lot of work and effort rely on the code adhering to the language’s format. Thus, it is worthwhile to know and keep the language’s conventions when programming. Check out the programming style guidelines section if you are unaware of the conventions for the programming language you use.
Existing software: Use existing software and tools before trying to program your own. Public packages have an immense advantage over our own private creations because the community uses them. This means that they are well documented and will have lots of explanations about how to use them. In addition, public packages are well-tested, and people who use these packages alert on any bugs or quirks we need to know about in dedicated support forums.
This is true not only for the methods that these packages offer, but also to the structure of the data that they expect and their output: packages such as MNE and fieldtrip have standardized data structures containing not only the “raw data” but everything that goes along with it: channels, channel localization, triggers, triggers identity mapping, metadata. Thus, using an existing file format makes our data structures generalizable. This is important because the analysis we create is tailored to the data’s structure, and so using these packages has the additional benefit of making the analyses steps themselves generalizable. In addition, the use of existing file formats simplifies file loading: instead of spending time loading the data, the event files, etc., existing structures are loaded in their entirety with a single command. File formats also simplify plotting, as they have built-in functions for that. So using standard formats is not only beneficial for your community once data is shared, or your collaborators while you work on the project; it also makes life easier for the individual researchers because if the format exists - there are solutions and packages built assuming this format.
Note: When using a tool, it is essential to know what it does. Read the documentation (every software package has one), make sure you understand the tool’s assumptions (e.g., statistical assumptions), limitations (e.g., what inputs are expected, what won’t work) and how it works. It’s not enough to find a program that looks like it fulfills your needs; you need to be able to know how it works, understand how to correctly incorporate it with your code, and of course, test it (see below).
When using modules and tools, you import them into your working environment. Sometimes these need to be updated, for example, if a correction was made or a functionality you need was added. But in other times, you don’t really need to keep track of the software’s versions; the functionality a module had when you chose to use it is enough, newer versions don’t offer any improvements to it that you must (like corrections), and so it’s best not to switch and not touch it. To be able to keep track of all the modules we use, their versions and the things that you need to run them, then ,for example, in Python, there is a “requirements” file. Having a file that “freezes” all the packages that you use, including their versions, help to understand what is crucial for your program to run, and document changes if there are any.
Check and test your codes
Even big software products in common use in the neuroscience community have mistakes and bugs. So when writing our own programs, we are bound to make mistakes as well. Testing is an inseparable part of creating codes (whether these are experiment programs, or analysis pipelines). Thus, any researcher who writes a program in a collaborative project must test your code - and there are ways actually to do it methodically and carefully.
As scientists, the goal of testing the software used for data processing and analyses is to discover the following types of weaknesses:
- Execution failures: parts of the code that do not operate and crash. Even if it looks like the code works properly, it might fail to run on specific inputs or in certain environments. These failures mean that your code simply cannot run smoothly when latent assumptions you make (about parameters, inputs, setups) are not kept. These can be solved by either explicitly restricting the parameters and inputs or by programming a more flexible software to manage variations.
- Logical errors: even if the code runs to completion, it might not perform the action it is thought to be doing. For example, the calculation might be wrong, or the data is not treated the way it is thought to be. In these cases, unless explicitly testing for those types of errors, they can go unnoticed, bias the results and lead to false conclusions about our data.
Working in a team does not mean the person who wrote a piece of software is exempt from testing it. The act of sharing codes does not guarantee their quality. Thus, researchers who program scripts in a collaborative project shouldn’t count on an assumption that in the future, when someone uses their code, they will test it. A programmer needs to take responsibility for their own codes, and part of that responsibility is to test that their scripts work. Notably, the entire section about code testing is relevant and good practice even when working completely alone.
How should one go about testing their code?
For every method the program uses, it should be clear what are the expected inputs and outputs, and the transformation that should happen when the function is executed. Knowing that, every method should have tests that provide certain inputs and expect certain outputs, asserting that the executed program worked properly. And so, code testing involves writing programs that call the software’s methods and functions and receive their results, checking them against the expected outcomes. if the result does not match the expected outcome (a logical error), or the input the test provided causes issues with running the software (an execution failure), the researchers should fix and update the program to overcome these issues.
Why does this need to happen while creating the analyses, and not right before data sharing? Testing creates an undesired overhead, that seems to only slow down the data processing stage. However, there are two main motivations for testing each new method added to the processing or analysis pipeline, instead of waiting until a script is “done”:
- Codes never feel “done”, even right before the sharing stage. Waiting for something to be “final” to start testing it means that crucial mistakes can go unnoticed, processes may not execute properly, and issues that could have been prevented with a small check will arise in the worst times possible. Thus, it’s best to not split the data processing into a “programming stage” and an “analysis stage”; while writing scripts, make sure to write complementary scripts that test them, and make sure that things run properly.
- Waiting for the analysis to be complete, or include all scripts and functions, to start testing it is a daunting task. This means that for every method written, whether it was a couple of days or a couple of months ago, one should start writing tests. At this point, it’s almost impossible to start writing separate tests for every part of the pipeline.
Thus, researchers shouldn’t wait for some endpoint before testing their scripts. Once a piece of code is written - write a test to validate it. Then, as the project progresses and functions are added or updated, these tests can be executed over and over, to make sure that the changes did not distort the working parts of the projects.
What do tests look like?
As scientists, we test our codes all the time. We try to see how well our code works by running every new function we write, examining the inputs and the outputs of the function, to see if the code runs properly and if the results make sense. Scripted code testing takes this practice, makes sure it’s documented, and automates it, so that you can make sure that your code does what it is supposed to do, even as you go about making changes in it. This way, you can always just re-run the original tests you wrote for a certain method, without manually repeating steps. As you progress, the codes you write become more and more complex and the project increases, to a point where the code contains many functions and it’s impossible to start writing separate tests for every part separately. This is why one shouldn’t wait to write tests - once a method is done, a test that validates its functionality should be written. This is called unit testing.
Unit tests are the process of checking small pieces of code to ensure that the individual parts of a program work properly on their own. This is a very useful type of tests for data analysis codes, as we usually have many steps both in the data pre-processing stage and in the analysis section, and it’s important to test that each step produces the desired output. Also, with this level of tests, it’s easiest to isolate if something’s wrong; whether it’s a bug or a logical error, unit tests help isolate the source for us to fix.
And once again - there is no need to reinvent the wheel and try to figure out how to write a separate script with test functions for each method that is part of the project from scratch. Test modules do that for us: these are ready-made packages allowing researchers to easily (and w/o mess) write unit tests for pieces of code. There are many types of test packages, even within the same programming language, but the idea of them is the same:
- Have a single runner that in a click of a button executes all the tests
- Detail what’s wrong when something fails, not just indicate it failed (knowing what exactly caused the test to fail)
As researchers, we are not only interested to see whether separate parts of the analysis pipeline work. We are interested in how different parts of the code interact, and whether they work correctly together. Surprisingly, there’s no shortcut here - our recommendation is to isolate the code to functions, test them, and then write unit-like tests for methods that combine two or more functions.
Another key point may sound trivial, but as the research project progresses it becomes relevant: make sure to actually run the tests. After every iteration of changes and updates, it’s good practice to re-run all the tests, ensuring the expected functionalities are kept.
Document everything
In a couple of days, weeks, or months - you would want to update something in what you built. A reviewer might ask for additional analysis, or that an existing one would be performed slightly differently. Looking at your own code from even a couple of weeks’ distance can sometimes be daunting. Documenting your functions in comments is helpful for your future self.

When in collaboration, this becomes even more relevant; it’s likely that other scientists will have to be able to use the program, to make progress with the research. Meaning that collaborators need to:
- Understand what the program is supposed to do
- Understand the right inputs and expected outputs
- Be able to execute the program (e.g., preprocessing, analysis) regardless of the availability of the researcher who programmed it
- Have the most up-to-date version of the program
This is why codes should be well documented, explicitly detailing the expected inputs and outputs, what parameters need to be set, and the manipulation the code does. When uncertain, it’s always best to elaborate too much than too little. In addition, as any researcher who has had experience in coding knows, scripts and methods keep being updated and proliferate as the project progresses. Thus, a related issue is the documentation of changes made in the codes. For that, two important tools need to be utilized: docstrings (text that describes methods, classes, and entire scripts), and version control (the next part). Documenting your code is important.
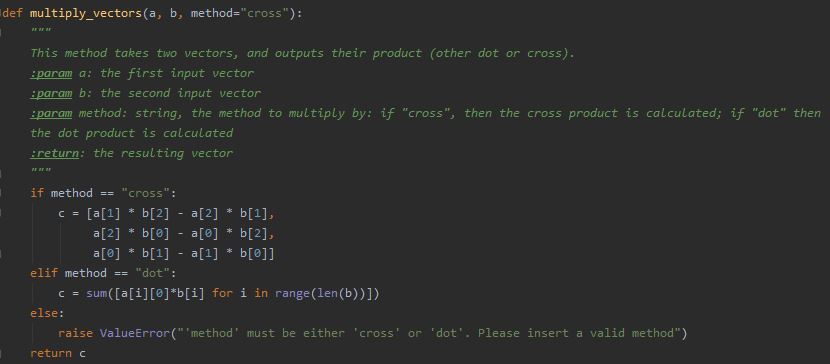
A docstring is a description (written in a human language, rather than code) you insert as a string at the beginning of a module, function, class, or method definition. Other documentation (comments you insert elsewhere within the code) are great for code readability, but they are not recognized as docstrings (meaning, not assigned special attributes; for example, not auto-completed by the IDE so that you can just “fill” the missing details).
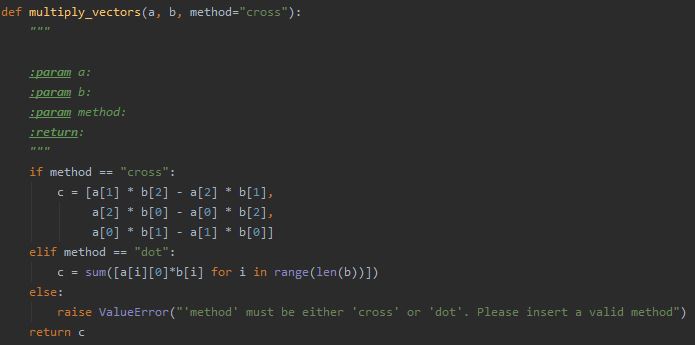
Be sure to document the types of expected inputs and outputs of each method, and to describe what this method does: what parameters do users need to set when using your scripts? Once again, there is no need to reinvent the wheel; to make things easier, various IDEs actually have shortcuts for docstrings. For example, in Python’s PyCharm, typing ‘ “”” ‘ under the line defining a function will automatically generate a docstring containing all the input parameters and return value of the method, for you to fill.
Of course, any other place where something non-trivial is happening in the code requires a comment explaining about it. It is not a docstring, but helps the user (or, future you) follow the flow of the scripts and understand the methods better.
So, despite it might seem redundant, as we can think that a function doesn’t do much or that the flow is self-explanatory, the importance of good documentation cannot be overestimated. A couple of minutes of investment can make our lives (and collaborators’ lives) easier. This also helps us save time explaining to collaborators how to go about and run the codes we created.
Version control & collaborative work on codes
Documenting our code is necessary, but when collaborating on processing and analyses codes in research projects, it is not sufficient. This is because it doesn’t solve the need for documenting changes to the codes, and being able to keep up with the updates we and others make to certain parts of the scripts.
We are very familiar with this process from our manuscripts- we continue to update and add, maybe have a parallel version where something is included or excluded, and then before we know it our manuscript becomes this monster with many patches.
If we are not careful, the same thing happens to codes. For example, we add some method, but we are not sure we need this part in the analysis, but then we do. Still, we find out there’s a better way to implement it - and before we know it, our code becomes a mess of dependencies and updates. The documentation we previously wrote doesn’t even match what our method does, or we added new methods and now things work differently, or we found a bug and corrected it, but it might have introduced new changes. And so on, until we are left with a version mess. And all that is true for working alone.
When working in collaboration, peers need to be able to use the scripts on their own; meaning, they need to know which code version is the latest, or the most stable one. If several researchers are collaborating on the analysis itself they need to integrate their methods together to a pipeline that makes sense. What if you are collaborating on the analysis itself, and you need to work with someone else to integrate your methods? For all of these reasons, we have version control.
More specifically, a protocol that is called git, and tools and interfaces that help to implement the version control git protocol (see more here). Version control is a protocol to record every change made to every file, so that nothing is lost - any change to any aspect of a document basically creates a whole new copy of the entire project you are working on, stamped in time. Just like after every iteration of editing your manuscript, you save a new version of it.
Git is a distributed system, allowing you to have this version control in a way that’s not limited to your own computer. Meaning, you use services, like github or gitlab or bitbucket - to provide you with a cloud, where your codes for your project all exist in the same place, for everyone you collaborate with to have immediate access to, and without you having to locally keep all the versions of your project. Not only git service providers allow to track what changes were made to a project, they also document by whom. That way, all the collaborators can move back and forth, and it is clear what is the most updated version of the project. See more below, in the git semantics section.
Version control helps us navigate and keep track of the different versions of our code. It’s useful for us to save and document our code at certain time points, so we’ll be able to go back in time for example if we find a certain bug, or to keep versions of our code that are separate from the modules we are working on now. When working collaboratively on a project, git is a life saver. When many people work on the same piece of code, they need to keep up with one another, and document the changes they introduce while having no conflicts.
What if researchers need to work in parallel on different parts of the same project? For example, if one collaborator wants to fix a bug in a specific method or step in the pipeline, but others want to continue developing the analysis, knowing that at some point the bug will be fixed and then this step will work well. Git makes it possible to work in parallel and merge back into a coherent project, allowing collaborators to work on the same project. See tips for collaborative work on git below. For more information and useful tutorials to start working with git, check out the resources).
Git semantics
When working with git version control protocol, there are a couple of basic terms you need to be familiarized with:
- Commit: a snapshot of your working tree at some point in time. In Git, the data is like a series of “snapshots” of a filesystem. Every time you commit (save the state of your project) Git takes a “picture” of what all the files look like at that moment, and stores a reference to that snapshot. In Git, there are three states that files can reside in: modified, staged, and committed.
- Modified: the file has changed locally (on your computer) but has not been committed to the database yet (a simple “save” command on the file you’ve been working on).
- Staged: you have marked a modified file in its current version to go into your next commit snapshot. This lets you select which of the modified files you want to be part of the next commit (the next “snapshot” of your project; git “add”).
- Committed: the data is safely stored in your local database, which is the locally saved version of your git project (git “commit”; takes the files as they are in the staging area and stores that snapshot permanently to your git directory).
- Repository: a collection of commits, each of which is a snapshot of what the project’s looked like at a particular point in time, whether on your computer or someone else’s. The repository has branches (see below), and so it is convenient to think about the project as a working tree.
- Push: once your changes are committed to the local working copy of the repository, you want to send them to the remote repository (git “push”). The push updates the remote server with the commit (“snapshot”) you just saved.
- Pull: to update the local version of the repository so that it will match the newest commit existing on the e server, you pull those changes from the remote version to your local one (git “pull”). That way, you can work locally on the most up-to-date version of the project.
- Branch: Branching means you diverge from the main line of development and continue to do work without messing with that main line. When you make a commit, Git stores a commit object that contains a pointer to the “snapshot” of the content you staged. This object also contains the author’s name and email address, the message that you typed, and pointers to the commit or commits that directly came before this commit (its parent or parents): zero parents for the initial commit, one parent for a normal commit, and multiple parents for a commit that results from a merge of two or more branches. Branching creates a new pointer for you to move around. For example, you can create a branch, do some work on it, and then switch back to the main branch and do other work. Both of those changes are isolated in separate branches: you can switch back and forth between the branches and merge them together when you’re ready. This is the basics allowing collaborators to work on codes in parallel in a shared research project. The mainline of development in most repositories is done on a branch called “main”. Although this is a typical default, it is in no way special.
Collaboratively working on git
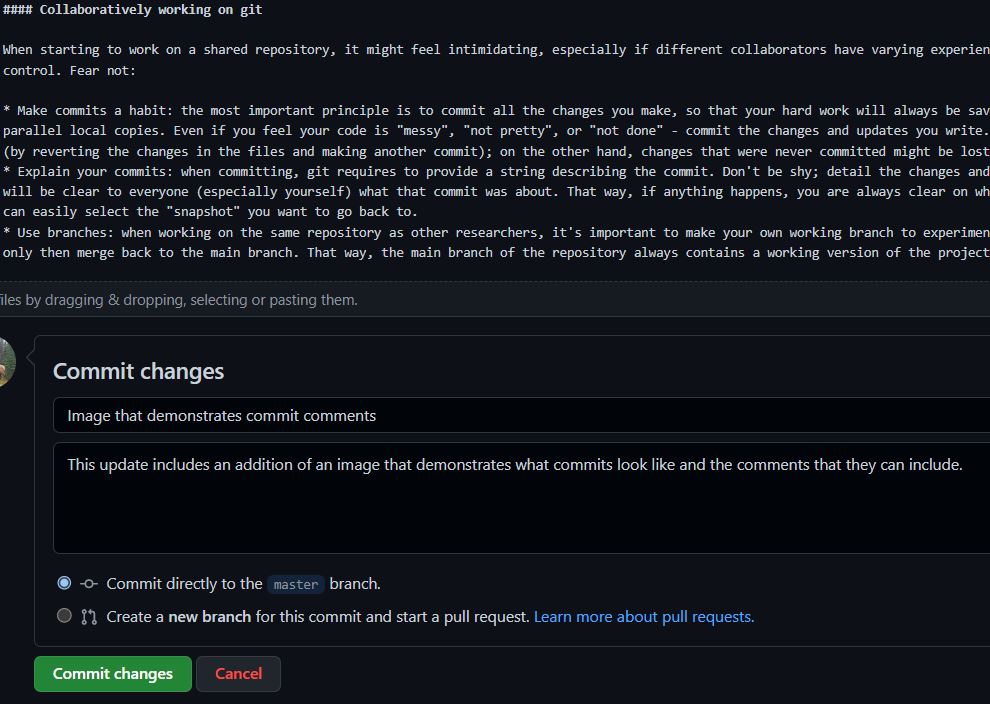
When starting to work on a shared repository, it might feel intimidating, especially if different collaborators have varying experience with programming and version control. Fear not:
- Make commits a habit: the most important principle is to commit all the changes you make, so that your hard work will always be saved, without having to save parallel local copies. Even if you feel your code is “messy”, “not pretty”, or “not done” - commit the changes and updates you write. You can always take changes back (by reverting the changes in the files and making another commit); on the other hand, changes that were never committed might be lost forever without a way to restore them.
- Explain your commits: when committing, git requires to provide a string describing the commit. Don’t be shy; detail the changes and updates that were made, so it will be clear to everyone (especially yourself) what that commit was about. That way, if anything happens, you are always clear on what is included in each commit and can easily select the “snapshot” you want to go back to.
- Use branches: when working on the same repository as other researchers, it’s important to make your own working branch to experiment and finalize the scripts on, and only then merge back to the main branch. That way, the main branch of the repository always contains a working version of the project.
For tutorials and git guides, check out the resources page.
Work with your peers
At the end of the day, it is very important to remember, especially when it comes to execution of planned analyses, that we are not only working with machines, code, and data: we work with people. Fellow researchers, who have different opinions, expertise, style and priorities than ours.
We discussed this topic in the Project Management section, and it is relevant here as well. Not sticking to what we know and prefer is hard, especially when not all scientists are as proficient in programming. Yet, this is what tools like git, and programming language standards and style guides are for; remember not to reinvent the wheel. Programming languages come with certain rules, and many programming IDEs actually help to adhere to them. Documentation provides clarity and helps people understand each other better. Testing also helps, as once a code is tested a certain quality is assured. Also, it’s important to keep in mind that the overarching goal is the same: to test a hypothesis together, while generating good quality data and analyses.
The earlier the challenge of collaborative data analysis is acknowledged, the better. Trying to implement git when scientists are already at the analysis stage is almost impossible; working in parallel is guaranteed cause frustrations, misunderstandings and holdups that can be prevented by working on a shared git repository. Thus, it is important to dedicate enough resources and time to ensure that researchers’ codes are a collaborative effort, rather than multiple individual works that are hard to work with and impossible to integrate together.
Practical tips and recommendations
- Establish a single programming language used in the collaboration (if useful modules are written in a different language, then incorporate them into the standardized programming language as external calls). This is useful for integrating different parts of data processing and analysis. At the end of the day, the fewer manual steps the data goes through from collection to results, the better; transferring intermediate-data that is output of one script to be read in another program is one such step.
- Establish a working project folder on one of the git services: make sure all codes are in one place; whether it is a project with several repositories for different analyses, or a single repository. The goal is for everyone to be able to contribute, see and use all the codes generated in the collaboration.
- Divide & conquer: when several researchers collaborate on data analysis, it is important to create clarity about the scripts they produce. This is important not just for credit and ownership; it also helps to prevent redundant work and parallel codes with no convergence. Suppose one researcher needs a particular functionality and can implement a code already written by another researcher to do so. In that case, it’s better than having two parallel methods that perform the same function. In addition, communication can help us understand how to write our scripts in a way that would be easy to integrate later with other people.
- Document: make sure each class and function begin with an elaborate docstring giving an overview and providing information about the calculations, limitations, inputs and outputs. Without it, other people researchers cannot benefit from your work. In addition, add comments whenever you think something in the code is not trivial.
- Establish data infrastructure conventions: expected inputs and generated outputs should be clear to all and adhere to the agreed-upon data infrastructure of the project.
Now what?
By now, you:
- Understand the importance of project management in collaborative science, and know which tools you can use to help you collaborate efficiently with as little friction and stress as possible
- Know that establishing a data infrastructure is a key part of a shared research project, without it the data is unusable.
- In this part, you learned how to go about processing this data, producing software that both has good quality, but more importantly, is shared among peers who work on it in parallel.
- Be sure to check out the resources for some useful tools for you and your lab
In summary, collaborations can be hard: there’s a lot to think about and plan, and yet there are many unknowns and things that don’t go as expected (check out the collaborative project management section). You need to constantly balance your needs and others’, and change the way you are used to work to accomodate the collaborative efforts. There’s no way around it, so it’s better to form those new habits when embarking on a shared research project. This allows researchers to realize how rewarding a collaboration is: they allow to acheive bigger goals, procide opportunities to learn new things, and greatly contribute to scientific progress.